ProCal can be used either manually with results entered using the keyboard and/or connected via the RS232 / GPIB bus to directly control many types of calibrators and measuring instruments.

Full use of pull down menus, data entry forms and graphical displays of data simplify operation, with a ‘fill in the boxes’ approach to data entry (no programming experience required!). For larger laboratories a network version of the software is available. ProCal software automates the calibration for many types of instruments, and produces printed calibration certificates.

- Complies with ISO-17025 Requirements
- Automates Calibrations for Cost Efficient Work
- Fast Procedure Writing with Procedure Wizards
- Text and Picture Procedure Prompts
- Multi Language Support
- Full Laboratory Management – Booking in to Shipment Back
- Recall Letter System
TRUE UNIVERSAL CALIBRATION SOFTWARE
ProCal provides a cost effective and easy to use solution for calibration from a single workstation through to networked multi disciplined laboratories. ProCal supports a database of equipment used in the laboratory, including all makes and types of calibrators, DMMs, standard resistors, capacitors, inductors, dead weight testers, crimp testers, temperature probes etc, in fact any standard or item of equipment used for calibration in a laboratory. ProCal integrates with ProCal-Track for total job control using a central Microsoft Access database. Translatable into any language.
QUICKLY CREATE & TEST CALIBRATION PROCEDURES
This is essential as every working laboratory knows there is always a large proportion of previously unseen equipment requiring new procedures. Wizards in ProEdit allow very fast creation of procedures based on generic type of instrument, e.g. DMM, Oscilloscope, RCD, Loop testers, pressure gauge etc.
Instrument accuracy is automatically calculated from entering the specification which also saves time and reduces errors. One of the most important features is the ability to run a procedure using ProCal in one window and with ProEdit running in another window it is possible to correct errors in a procedure as it is run, the calibration of the instrument does not have to be aborted due to a mistake in the procedure.

INTUITIVE TO USE WITH CLEAR GRAPHICAL INTERFACE
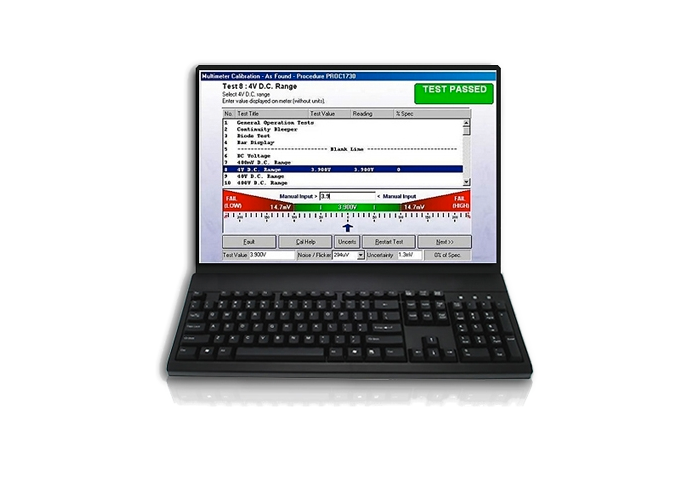
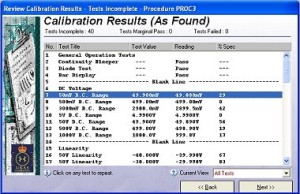
Each test result is graphically represented as a measurement bar scaled to the specification of the instrument under test. Using easy ‘traffic light’ style indication, test pass/marginal/failed states are displayed. Measurement uncertainty is also clearly displayed either side of the measurement point. Test sequences are shown in a list box and indicate the test point reached in a procedure – any test can be run instantly by clicking a test line in this list box. A calibration can be halted and saved with status ‘Awaiting customer response’, ‘As Found Done, Awaiting Adjustment’ etc. Calibrations can then be recalled for completion at a later time.
The calibration sequence is presented in ‘wizard’ style screen with ‘Next >’ and ‘< Back’ buttons for easy to use operation.
COMPREHENSIVE TEST WITH PICTURE AND VIDEO PROMPTS
Text, pictures or even video file prompts can all be easily incorporated within a ProCal procedure to help guide a technician through a calibration.
At the click of a button the engineer can record any information relevant to calibrating the instrument under test using ProCal’s built in technical help file system. This can then be used as a lookup reference when calibrating this type of instrument in the future.
ProCal has the ability to use built-in generic connection diagrams for specific tests (Eg. Connection to a multimeter for DC Voltage measurement).
BUILT IN UNCERTAINTY CALCULATIONS TO M3003 / GUM
ProCal can automatically calculate uncertainties as required by M3003 / GUM Standards. This is calculated for each test as the measurement is performed and saved along side the result. The uncertainty calculation is clearly displayed in a ‘spreadsheet style’ view showing the individual uncertainty contributions, including noise/flicker. The contributions in this template can be defined by the user for a specific measurement parameter including imported uncertainty and stability figures for the reference instrument used.
CLOSED LOOP CALIBRATION & ATE CONTROL
Use the powerful, yet easy to use command language in ProCal to control and read back from any GPIB / RS232 device. Closed loop calibration procedures can easily be written with easy to understand one line control commands (including UUT address configuration) – no programming required!
ProCal can offer a solution for custom ATE control systems where scanners, switches & PSUs etc. need to be remotely configured.
POWERFUL DOCUMENTING AND REPORTING CAPABILITIES
Print certificates and reports directly from ProCal which conform to ISO standards or design your own custom certificates & reports using the powerful reporting functions in Crystal Reports. Using the information held in the ProCal database, many types of report can be produced including repair estimates, fault reports, reverse traceability etc. Several example reports and certificate styles are supplied with ProCal and users can customise these or create new reports.
ProCal supports five certificate types, each with its own number counter : Accredited • Standard • Conformance • Electrical Safety and Test Report plus your own custom styles. This flexibility provides universal support for any required use in the calibration laboratory… and beyond. ProCal also allows customisable calibration labels with company logos to be printed.

DATA IMPORT / EXPORT FOR ON-SITE CALIBRATION
To allow on-site work to be carried out and easy imported back into the main database, an optional software package is available. This allows jobs to be exported at the beginning of the day, taken to an on-site location for results completion and then re-imported into the main database on return.
ONLINE PROCEDURE LIBRARY
A library of calibration procedures is available – this is a subscriber service based on a credits system – a user can purchase credits and download procedures which are rated with a number of credits based on its complexity.
PROCALTRACK
TOTAL JOB CONTROL FROM GOODS IN TO DESPATCH
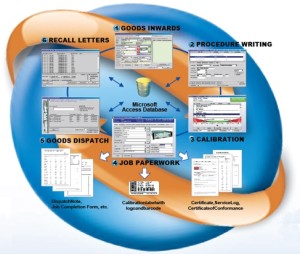
ProCal-Track provides the tools for management of instruments from goods-in through to despatch, including external calibration work, laboratory assets and stock/demo instruments etc. Users can open a virtual job card from any PC to view current or historical data. Use of digital photos can be implemented to aid user recognition. Instrument recall letters can also be issued on a regular basis.
VIRTUAL JOB CARD : DYNAMIC JOB TRACKING
Most paperwork systems are based around job cards / work sheets. With ProCal-Track, Transmille have retained this familiar format and created electronic, centrally stored records. As work is booked in, a job record is created to keep all details of the job including information such as accessories received and customer comments.
The great advantage of the computerised job record is that it is centrally available to anyone, anywhere at any time. This information is stored for the lifetime of the instrument, and is available even after the instrument has been returned to the customer with a detailed history of the instrument recorded.
GOODS INWARDS & ACCESSORIES MANAGEMENT
Using our experience in running a successful calibration laboratory, Transmille has refined the booking in process to make it as fast and easy to use as possible. On screen aids such as drop down lists, automatic instrument recognition (a lookup of model number to find an instrument’s manufacturer and description) and selectable printout of job sheet or label are available.
COMPREHENSIVE FORMS, REPORTS & LABELS
ProCal-Track provides the facility to print out a range of forms, reports and labels (with barcodes) using the DYMO range of thermal printers. A user can query the database for information about instruments for a specific customer and print out these details, re-issue certificates or service logs and print system ID or serial number labels.
Support for viewing / printing Crystal Reports is built in as standard. Using the Crystal Reports designer other reports can be custom designed and used in ProCal-Track.
CALIBRATION & REPAIR SUB CONTRACT HANDLING
Sub contract work can be recorded in the database, and monitored using the reports to view, for example, outstanding sub contacted instruments – this allows an overview of sub contracted work to be maintained. Instruments issued to sub contractors can then be processed using the normal goods inwards function when received and the database will recognise and update the system.
FAULT & ESTIMATE REPORTING
The parts used, labour and recalibration costs stored in ProCal-Track can be used to automatically create reports to inform customers of faults and give cost estimates. These reports can be directly emailed or faxed directly from the engineers workstation, saving office staff time and ensuring correct information is quickly passed to the customer. These reports can be customised using Crystal Reports.
Instruments can be marked as ‘do not recall’ as required, with recall processing collated as required (e.g. Collated by user to send recalls to specific engineers).
CERTIFICATES ON THE WEB (OPTIONAL)
Upload PDF versions of certificates to your own online web service, giving access to instrument recall calibration information with this optional add-on package.


